
PrestoDB is a powerful distributed SQL query engine used widely for large-scale data analytics. Contributing to Presto is an excellent way to gain hands-on experience with distributed systems, Java, SQL engines, and large open-source codebases.
This step-by-step tutorial is designed specifically for beginners and first-time contributors who want to build Presto from source, run the Presto server locally, understand the codebase, and successfully submit their first pull request. By the end of this guide, you will have a fully working local Presto setup and a clear understanding of the complete contribution workflow, from Git setup to PR merge.
Prerequisites
| Requirement | Details |
|---|---|
| Operating System | macOS or Linux (Windows via WSL2) |
| Java | Java 17 (64-bit) – OpenJDK or Oracle JDK |
| Python | Python 2.4+ (Not Required for Development, only for launcher scripts) |
| Git | Latest version |
| RAM | Minimum 8GB (16GB recommended) |
| Disk Space | At least 10GB free |
Tip
IntelliJ IDEA is recommended for Presto development.
Knowledge Prerequisites
- Java Programming Knowledge.
- Familiarity with command-line tools
- Git & Version Control Basics.
- Maven Build Tool.
- SQL & Distributed Systems knowledge (helpful but not required).
Required Accounts
- GitHub Account
- Slack Account (To Join Presto Slack
Community)
Configuring Git
Before contributing to Presto, you must properly configure Git and GitHub to ensure your contributions are correctly attributed to your profile. If you are a macOS user, use the pre-installed Git . But, if you are using Linux or Windows, download the latest version of Git from here.
Open the terminal and run the below command.
git --versionConfigure Git with your name and email.
- Set your name
git config --global user.name "Your Name"- Set your email
git config --global user.email "example@gmail.com"Important
Your Git commits must use an email address that is verified on your GitHub account. If the email does not match or is not verified, your contributions will not appear in your GitHub contribution graph, even if your PR is merged.
Installing Java Development Kit (JDK)
- Download and Install Java 17 (either OpenJDK or Oracle JDK).
- Download .dmg file (if you are on macOS), click here to download.
- Set JAVA_HOME (add to ~/.zshrc or ~/.bash_profile).
- Verify JDK Installation
java -versionForking and Cloning the Repository
Forking The Repository
- Navigate to the
Presto GitHub repository - Click the “Fork” button in the top-right corner
- Create a copy of the Presto repository under your GitHub account.
Cloning Your Forked Repository
- Navigate to the directory where you want to store the project on your local machine.
cd ~/ Desktop (or your preferred Directory)- Clone the project
git clone https://github.com/YOUR_USERNAME/presto.git- Navigate to the directory
cd ~/ presto- Verify the cloned repository.
ls -laUnderstanding the Presto Project Structure (Codebase)
Understand the key modules in the Presto codebase:
presto/
├── .github/              # GitHub workflows and templates
├── docker/               # Docker configurations
├── presto-accumulo/      # Accumulo connector
├── presto-analyzer/      # Semantic analysis and query validation
├── presto-base-jdbc/     # Base JDBC connector
├── presto-cli/           # Command-line interface
├── presto-client/        # Client libraries
├── presto-common/        # Common utilities
├── presto-docs/          # Documentation (Sphinx/RST)
├── presto-hive/          # Hive connector
├── presto-main/          # Core engine
├── presto-parser/        # SQL parser
├── presto-server/        # Server packaging
├── presto-spi/           # Service Provider Interface
├── presto-tests/         # Integration tests
├── pom.xml               # Root Maven configuration
├── CONTRIBUTING.md       # Contribution guidelines
└── README.md             # Project overview
| File | Purpose |
|---|---|
README.md | Project overview and build instructions |
CONTRIBUTING.md | Contribution guidelines |
ARCHITECTURE.md | Mission and technical architecture |
pom.xml | Maven project configuration |
CODEOWNERS | Code ownership and module maintainers |
Info
Note that each module has its ownpom.xmland follows Maven’s standard directory structure.
Setting Up IntelliJ IDEA for Presto
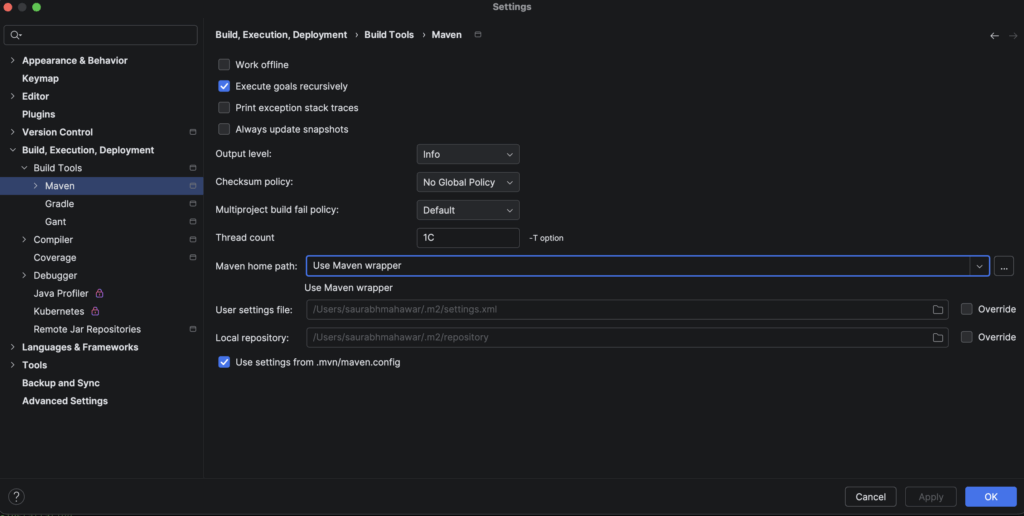
1. Configure Maven:
- Go to IntelliJ IDEA → Settings → Build, Execution, Deployment → Build Tools → Maven → Use Maven wrapper
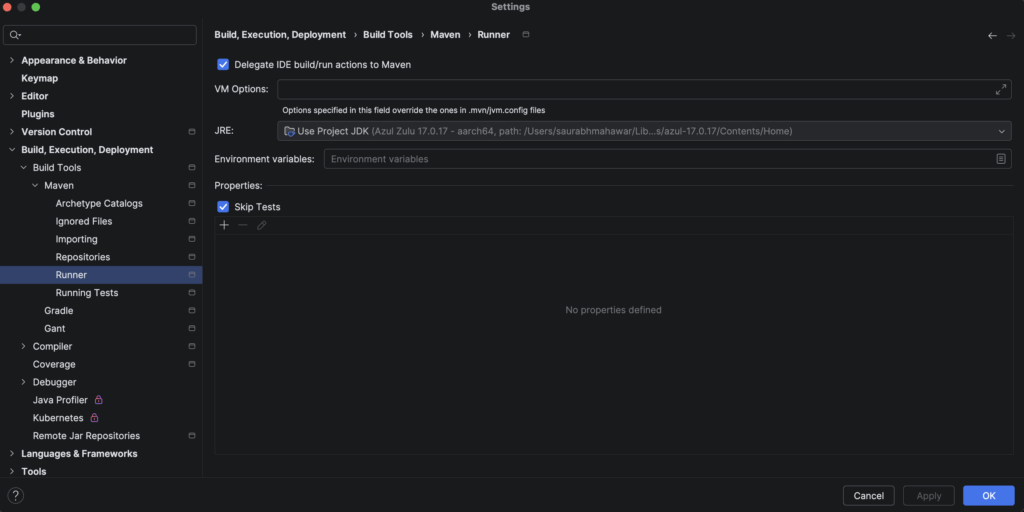
- Go to Maven → Runner → Enable Skip Tests → Click Apply → OK
2. Configure JDK:
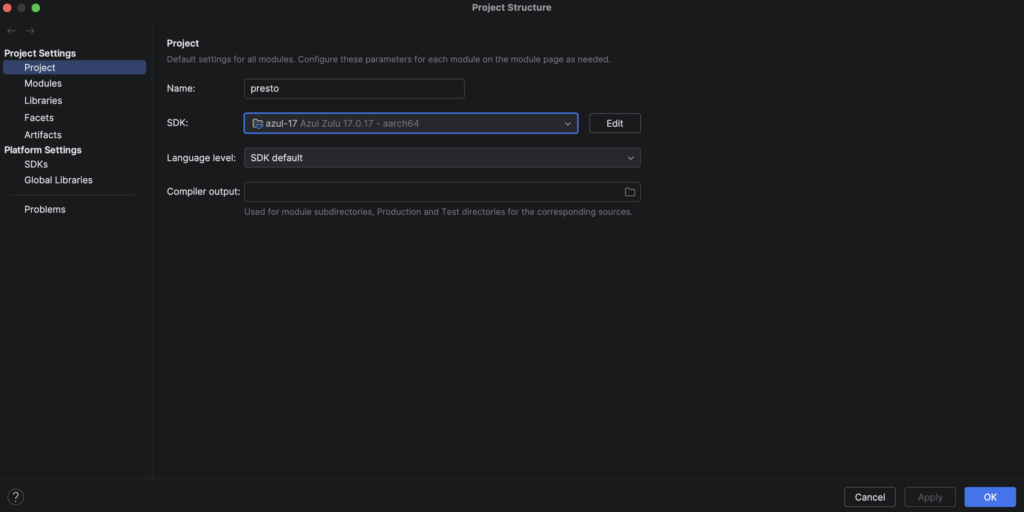
- Go to File → Project Structure → Project
- Set SDK to Java 17 (or download directly)
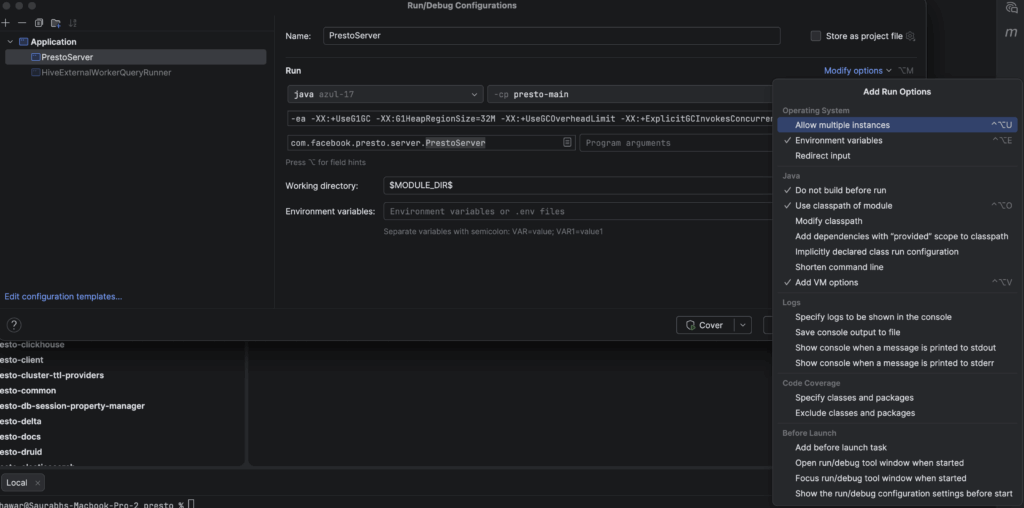
- Go to Run → Edit Configurations
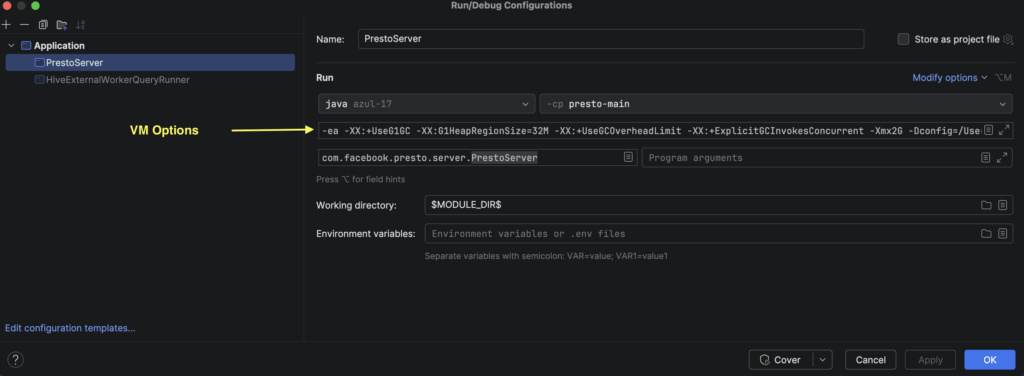
- Set Java 17 as SDK and presto-main as class path.
- Add below configurations in VM Options.
-ea
-XX:+UseG1GC
-XX:G1HeapRegionSize=32M
-XX:+UseGCOverheadLimit
-XX:+ExplicitGCInvokesConcurrent
-Xmx2G
-Dconfig=/Users/your-complete-path/presto/presto-main/etc/config.properties  ----> Paste presto-main/etc/config.properties path
-Dlog.levels-file=etc/log.properties
-Djdk.attach.allowAttachSelf=true
--add-opens=java.base/java.io=ALL-UNNAMED
--add-opens=java.base/java.lang=ALL-UNNAMED
--add-opens=java.base/java.lang.ref=ALL-UNNAMED
--add-opens=java.base/java.lang.reflect=ALL-UNNAMED
--add-opens=java.base/java.net=ALL-UNNAMED
--add-opens=java.base/java.nio=ALL-UNNAMED
--add-opens=java.base/java.security=ALL-UNNAMED
--add-opens=java.base/javax.security.auth=ALL-UNNAMED
--add-opens=java.base/javax.security.auth.login=ALL-UNNAMED
--add-opens=java.base/java.text=ALL-UNNAMED
--add-opens=java.base/java.util=ALL-UNNAMED
--add-opens=java.base/java.util.concurrent=ALL-UNNAMED
--add-opens=java.base/java.util.concurrent.atomic=ALL-UNNAMED
--add-opens=java.base/java.util.regex=ALL-UNNAMED
--add-opens=java.base/jdk.internal.loader=ALL-UNNAMED
--add-opens=java.base/sun.security.action=ALL-UNNAMED
--add-opens=java.security.jgss/sun.security.krb5=ALL-UNNAMED
- Set Main Class to
com.facebook.presto.server.PrestoServer - Set Working Directory
$MODULE_DIR$ - Click on Modify options and tick the options, as mentioned in below snapshot.
- Click Apply to save the configuration. IntelliJ is now set up and ready for Presto development.
Building Presto from Source
Build Presto from source to verify your environment and test your changes.
- Navigate to the directory where presto is cloned.
cd ~/Desktop/presto- Run the following command to build Presto for the first time.
./mvnw clean install -DskipTestsInfo
mvnw: Runs Maven Wrapper
clean: Removes previous build artifacts
install: Compiles code, packages it, and installs to local Maven repository
DskipTests: Skips running tests (faster for initial build)
Important
Skipping tests is acceptable only for initial setup or local exploration.
All PRs must pass tests and should be built without-DskipTestsbefore submission.
Expected Output
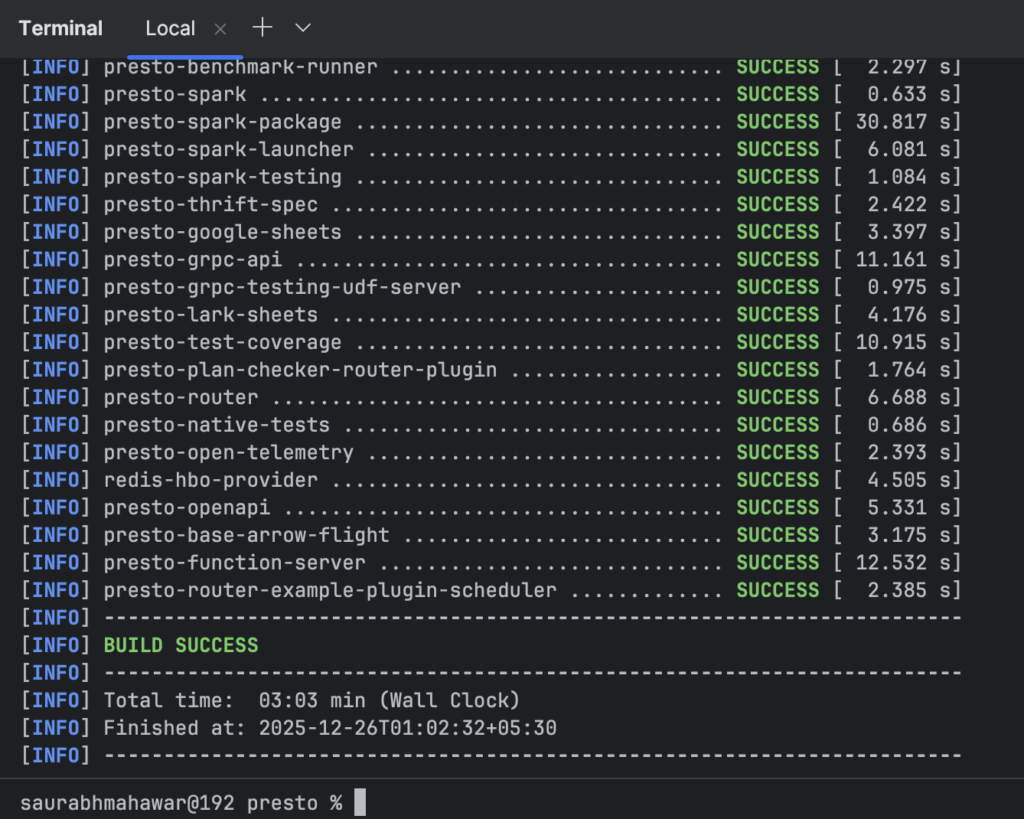
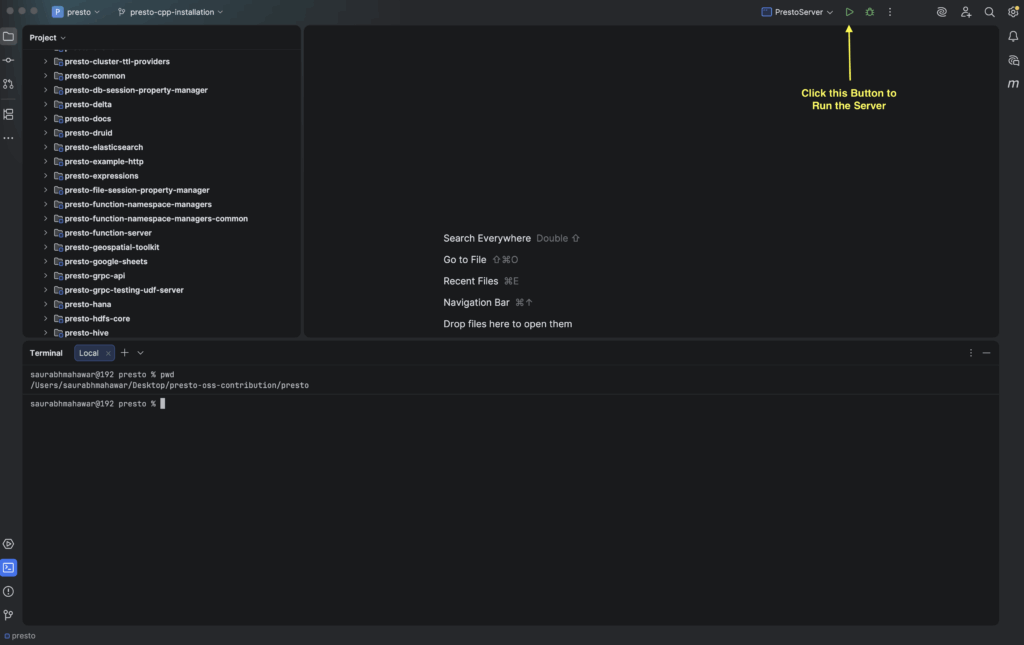
- Verify the setup and run the Presto server directly from IntelliJ.
- Confirm that the Presto server is running on
localhost:8080
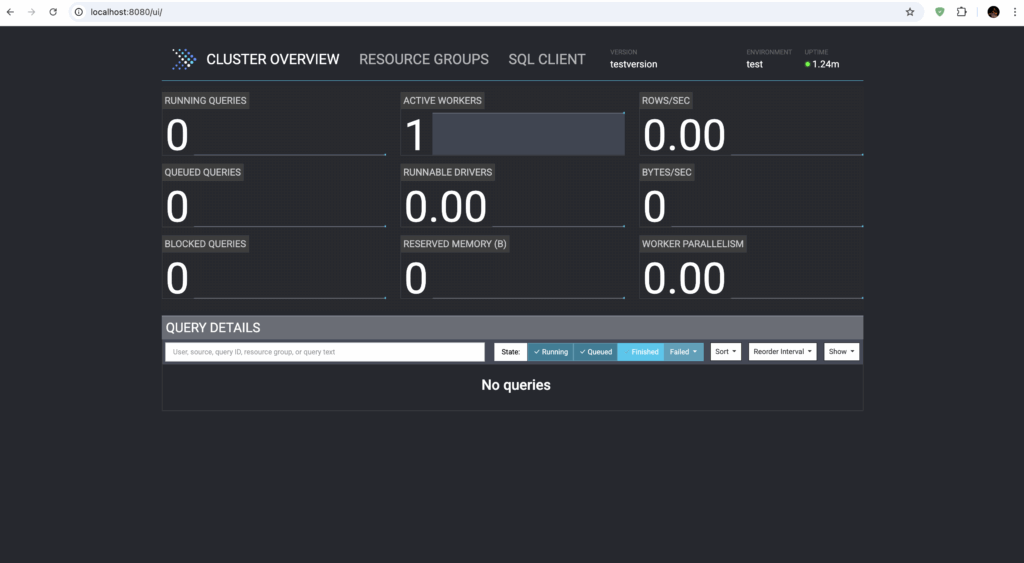
Success
Server is running on localhost:8080
Connect with Presto CLI
- Open a new terminal, navigate to the presto-cli directory, and then move into the target directory. Run below command.
cd presto-cli/targetjava -jar presto-cli-*-SNAPSHOT-executable.jar \
--server localhost:8080- Verify that the presto prompt appears.
presto> show catalogs;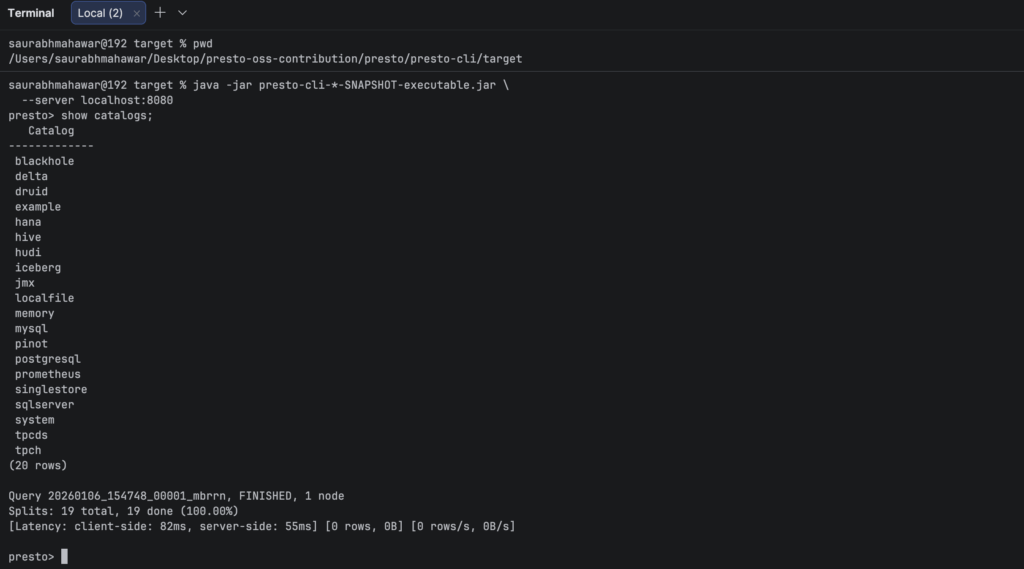
Success
Connected with Presto CLI
Build Specific Modules
- To build only a specific module, run the below command:
./mvnw clean install -DskipTests -pl presto-cliSetting Up Upstream Remote
Keep your fork synchronized with the main Presto repository.
- Add the upstream remote
git remote add upstream https://github.com/prestodb/presto.git- Verify your remote
git remote -vExpected Output
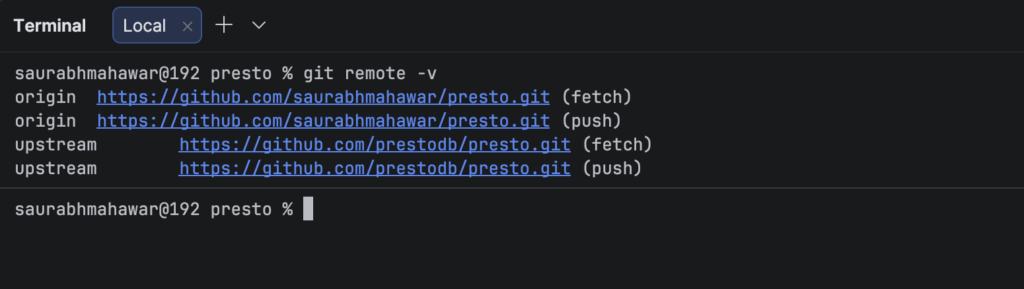
- origin: Your fork on GitHub (where you push changes)
- upstream: The main Presto repository (where you pull updates)
Note
Do not commit changes directly tomaster. Always create a feature branch.
Making Code Contributions
Syncing Your Fork
- Before creating a new branch, ensure your fork is up to date:
#Make sure you're on master
git checkout master

#Fetch updates from upstream
git fetch upstream

#Merge upstream changes into your master
git merge upstream/master

#Push updates to your fork
git push origin master
Tip
Sync your fork regularly to avoid merge conflicts.
Find an Issue to Fix
- Visit the
Presto Issues Page, or - Look for issues that interest you, or
- Find an Issue to fix with labels like
good first issues,documentation, etc
Important
Comment on the issue to let others know you’re working on it.
Creating a Feature Branch
- Create and switch to a new branch, use descriptive branch names that indicate what you’re working on:
git checkout -b feature/meaningful-branch-nameExample
feature/add-trim-function
bugfix/fix-null-pointer-in-parser
docs/update-contribution-guide
refactor/simplify-planner-logic
test/add-hive-connector-tests
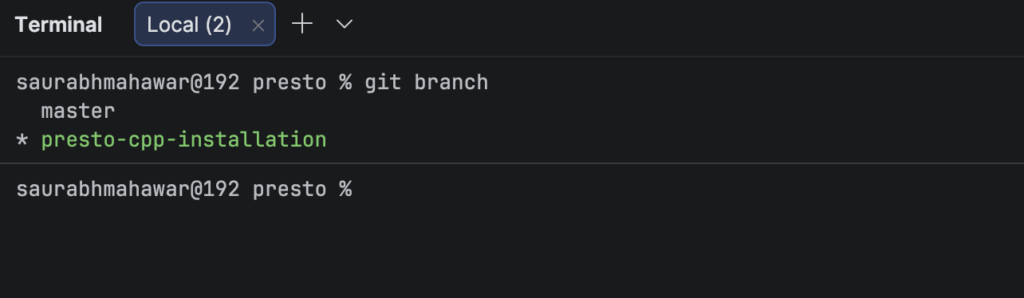
- Verify that you are on the new branch.
git branchExpected Output
- Make Your Changes in the Code
- Write or Update Tests
- Run Tests Locally
# Run tests for the module you changed
cd presto-main
../mvnw test

# If all pass, run full build
cd ..
./mvnw clean install- Commit your changes
# Stage your changes
git add .

# Commit with proper format
git commit -m "Your Message"
- Write clear and descriptive commit messages.
Example
Commit Message Format:<type> [(scope)]: <subject>[optional body][optional footer]
Types:
feat: New feature
fix: Bug fix
docs: Documentation only
refactor: Code refactoring
perf: Performance improvement
test: Adding or modifying tests
build: Build system changes
Todo
Subject Line Rules:
Start with capital letter
Use imperative mood (“Add feature” not “Added feature”)
No period at the end
Be concise but descriptive
Limit to 50-72 characters when possible
Example
git commit -m “feat(function): Add trim function with custom characters”
git commit -m “fix(parser): Handle null values in WHERE clause”
git commit -m “docs(connector): Update Hive connector configuration guide”
- Push to your Fork
git push origin feature/meaningful-branch-name- Create a Pull Request (PR)
- Go to your fork on GitHub:
https://github.com/YOUR_USERNAME/presto - Click “Compare & pull request”
- Set: Base repo:
prestodb/presto, Base branch:master, Head repo: your fork, Compare branch:your feature branch - Fill out PR Template.
- Sign the CLA
Important
On your first PR, the CLA bot will comment asking you to sign the Contributor License Agreement:
Click the link provided by the bot
Sign the CLA electronically
The bot will update your PR status
Success
You have successfully submitted your PR to Presto Open Source Project
After Your PR is Merged
Congratulations! You are now a contributor to the Presto project.
Creating Your Own Issues
If you find a bug or have an idea for improvement:
Search for Existing Issues
- Make sure it hasn’t been reported already
- Search closed issues too (it might have been fixed)
Create a New Issue
- Go to github.com/prestodb/presto/issues/new/choose
- Choose the appropriate template (Bug Report, Feature Request, etc.)
- Fill out all sections thoroughly
- Add relevant labels
- Submit the issue
Discuss Before Implementing
- Wait for feedback from maintainers
- Get approval before starting work
Important links
Presto Website:https://prestodb.io
GitHub Repository:https://github.com/prestodb/presto
Slack:https://communityinviter.com/apps/prestodb/prestodb