

Background
Transparent Proxy
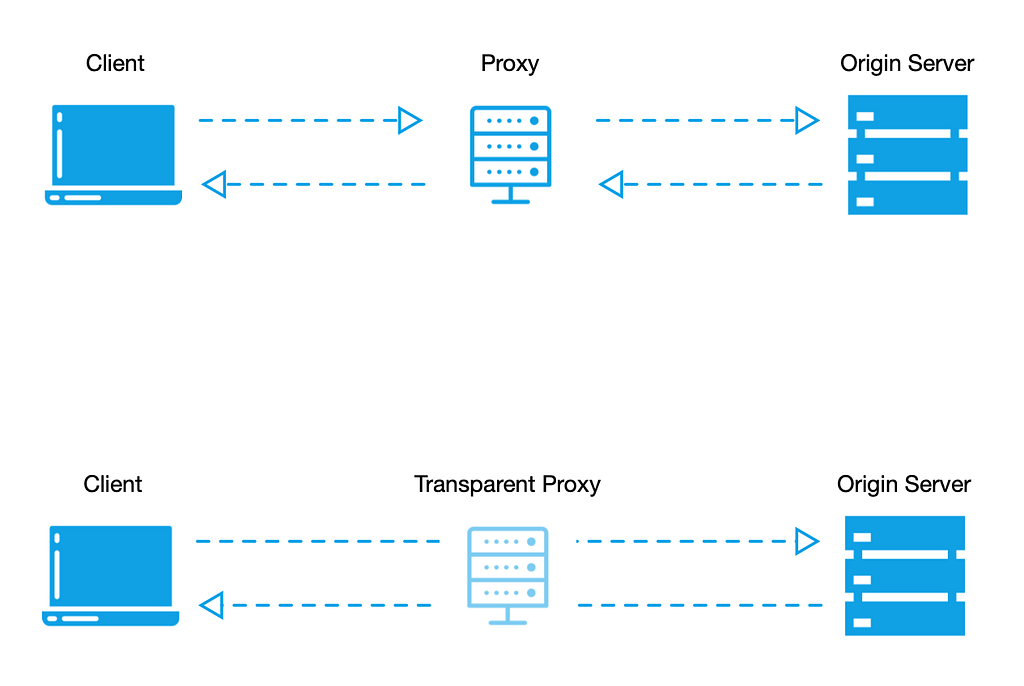
A transparent proxy is a type of network middleware that can intercept and forward network traffic without the user’s knowledge. Unlike traditional proxies, a transparent proxy does not require specific proxy settings to be configured on the user end. Instead, it intercepts traffic at the network level to provide proxy services. Transparent proxies are commonly used for network management, security policy enforcement, traffic monitoring, and optimization. They can implement functions such as content filtering, cache acceleration, traffic control, and load balancing. Common technologies like TPROXY, NAT, and Divert can be utilized to achieve a transparent proxy.
eBPF
eBPF is an efficient and flexible kernel technology that allows user-space programs to safely run pre-compiled and restricted programs within the Linux kernel space (i.e., eBPF programs) without changing the kernel source code or loading kernel modules. In recent years, the extensive application of eBPF in networking has made it one of the optional technologies for implementing a transparent proxy.
Pipy has added support for BPF from version 0.99.1, enabling the loading and parsing of BPF programs; the syntax upgrade in version 1.0 has made it more convenient to implement control logic. Today, we will introduce how to implement a simple transparent proxy using Pipy + eBPF.
Note: All the code mentioned in the article can be found in the Pipy repository: https://github.com/flomesh-io/pipy/tree/main/samples/bpf/transparent-proxy.
Quick Start
Clone the code.
git clone https://github.com/flomesh-io/pipy.git
cd samples/bpf/transparent-proxy
Compile the BPF program, and you can find the compiled .o file in the directory afterward.
make
Start the transparent proxy.
sudo pipy main.js
Once successfully running, the proxy listens on port 18000. Next, let's send a request to test:
curl -L bing.com
In the proxy’s console, we can find the request and response logs.
GET / bing.com
  301 Moved Permanently
GET / www.bing.com
  200 OK
Throughout the process, the proxy remains transparent to the client, requiring no proxy configuration.
Next, we will delve into the implementation of the transparent proxy.
Implementation
eBPF Program Design

Three eBPF programs are used in the implementation, each responsible for different tasks of network interception and forwarding:
- Address Replacement at Connection Establishment: The first eBPF program, cg_connect4, attaches to the connect system call. When a client attempts to establish a connection with a target server, this program replaces the target's IP address and port with the address and port of the Pipy proxy (usually the local address 127.0.0.1). At the same time, it saves the original target address and port in the struct sock and saves the mapping of the socket's cookie to this sock structure in map_socks for later query and data forwarding.
- Source Address Recording After Connection Success: The second eBPF program, cg_sock_ops, executes after a connection is successfully established, responsible for recording the source address and port and updating this information in the corresponding sock in map_socks. Additionally, it saves the mapping of the source port and the socket's cookie in map_ports, providing necessary information for subsequent data forwarding.
- Connection and Forwarding Based on Original Destination Information: The third eBPF program, cg_sock_opt, is triggered when Pipy queries the original destination information through getsockopt. This program uses the source port to retrieve the socket's cookie from map_ports, and then from map_socks to get the original destination information, then establishes a connection with the original target and forwards the client's request.
eBPF Program Loading
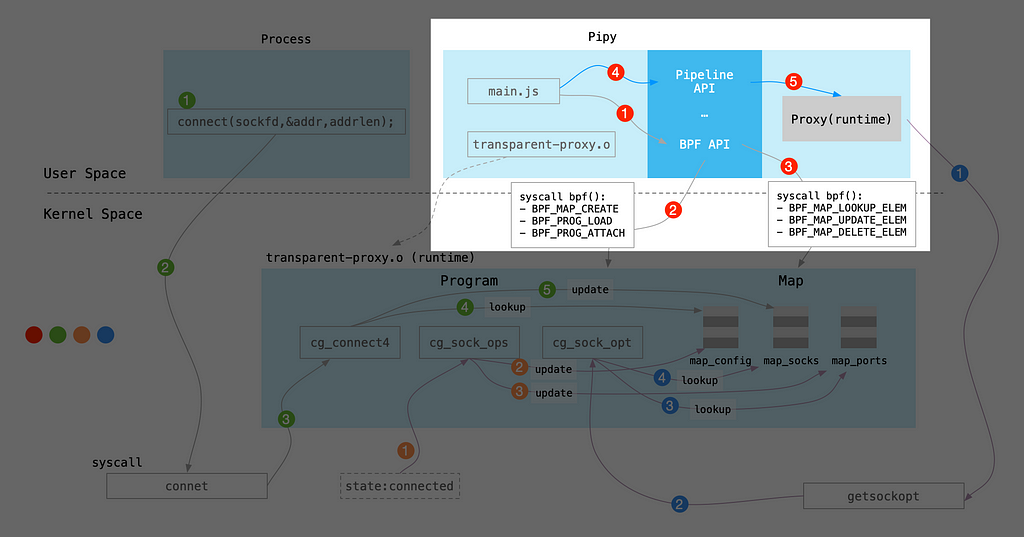
With the support for BPF in Pipy, developers can directly handle BPF programs in PipyJS, meaning operations on BPF no longer depend on tools like bpftool or require development with other language libraries like BCC, GoBPF. This integration offers significant convenience and flexibility, allowing the eBPF control plane and proxy logic to run in the same process, simplifying deployment and management.
Here is a key code explanation for operating eBPF in Pipy, based on the example in the main.js file:
In PipyJS, you can use the bpf module's API to load and operate eBPF programs. Here's a typical usage:
Use the bpf.object() API to load a compiled eBPF program object; this step requires specifying the path of the eBPF program file. Then, use the load() method to load the eBPF program into the kernel. This step is necessary because only after being loaded into the kernel can the eBPF program start working.
var obj = bpf.object(pipy.load('transparent-proxy.o'))
var progCgConnect4 = obj.programs.find(p => p.name === 'cg_connect4').load('BPF_PROG_TYPE_CGROUP_SOCK_ADDR', 'BPF_CGROUP_INET4_CONNECT')
var progCgSockOps = obj.programs.find(p => p.name === 'cg_sock_ops').load('BPF_PROG_TYPE_SOCK_OPS')
var progCgSockOpt = obj.programs.find(p => p.name === 'cg_sock_opt').load('BPF_PROG_TYPE_CGROUP_SOCKOPT', 'BPF_CGROUP_GETSOCKOPT')
Write the configuration into the Map map_config, where the configuration is the port the proxy listens on.
obj.maps.find(m => m.name === 'map_config').update(
  { i: 0 }, {
    proxy_port: PROXY_PORT,
    pipy_cgroup_id: bpf.cgroup(CGRP_PIPY)
  }
)
Then you can attach the eBPF programs to the specified hooks.
bpf.attach('BPF_CGROUP_INET4_CONNECT', progCgConnect4.fd, CGRP)
bpf.attach('BPF_CGROUP_SOCK_OPS', progCgSockOps.fd, CGRP)
bpf.attach('BPF_CGROUP_GETSOCKOPT', progCgSockOpt.fd, CGRP)
Also, don’t forget to clean up the eBPF programs when the proxy exits.
pipy.exit(
  function() {
    bpf.detach('BPF_CGROUP_INET4_CONNECT', progCgConnect4.fd, CGRP)
    bpf.detach('BPF_CGROUP_SOCK_OPS', progCgSockOps.fd, CGRP)
    bpf.detach('BPF_CGROUP_GETSOCKOPT', progCgSockOpt.fd, CGRP)
    os.write(`${CGRP}/cgroup.procs`, pipy.pid.toString())
    os.rmdir(CGRP_PIPY)
  }
)
After completing the eBPF control plane logic, the next step is the implementation of proxy forwarding.
Use the Pipeline API onStart to get the client's original destination information via socket.getRawOption after successfully connecting with the client. This action will trigger the third eBPF program mentioned above.
pipy.listen(PROXY_PORT, $=>$
  .onStart(
    function (ib) {
      var od = new Data
      ib.socket.getRawOption(SOL_IP, SO_ORIGINAL_DST, od)
      var sa = sockaddr_in.decode(od)
      var addr = sa.sin_addr
      var port = sa.sin_port
      $targetAddr = addr.join('.')
      $targetPort = (port[0] << 8) | port[1]
    }
  )
  ...
Conclusion
This simple example of a transparent proxy effectively demonstrates the combined power of Pipy and eBPF, two programmable technologies. Although there is a gap from achieving an ideal transparent proxy — for example, the target server sees the proxy’s address instead of the client’s real IP, which is crucial for scenarios requiring recording of the real client IP — with eBPF technology, we can still achieve the goal. The approach involves using eBPF programs to adjust the source address and port in the network packets forwarded by Pipy and modifying the destination address and port in the returning packets to achieve transparency to the target server.
Compared to other technical solutions, eBPF provides unmatched flexibility and programmability in implementing transparent proxies. It not only reduces dependence on kernel network stack processing but also significantly enhances performance.
By integrating operations of eBPF programs into Pipy, we can achieve seamless integration of application-layer and kernel-layer programmable functionalities, further strengthening the practicality and efficiency of this solution.
<hr /><p>Implement Transparent Proxy with Pipy and eBPF was originally published in Flomesh on Medium, where people are continuing the conversation by highlighting and responding to this story.</p>