
Mechanical Turk is designed to require an Assignment ID in order for a Requester to issue a payment to a Worker. However, as an Assignment ID is only generated when a Worker successfully submits a HIT to a Requester for review, it is not currently possible to issue a payment to a Worker who was unable to submit a HIT to a Requester for review. However, Workers will occasionally contact Requesters for assistance when they have completed the work requested, but were unable to successfully submit the work to the Requester through the Worker UI. We have set up the following HIT template to allow Requesters to create a simple HIT for these Workers, so the Requester can pay the Worker should they choose to do so.
For this HIT, we will be creating a simple layout where the Worker can accept the HIT, enter their Worker ID and submit the HIT for approval. When setting up the HIT, you’ll have the option to either set the full amount you intend to pay, or set it for $0 enabling you to bonus them the reward amount afterwards.
Please note: The reward amounts you chose are still subject to the Mechanical Turk fee structure, so please be sure to review your cost estimates before publishing your HIT (https://requester.mturk.com/pricing).
While this walk through is designed to create a HIT for one Worker, it can also be used to create a HIT for multiple Workers as well. You will need to assign all the Workers the same qualification and set the number of assignments for the HIT to the total number of Workers you are wanting to pay.
Custom Qualification
The first thing you want to do is create a Custom Qualification to grant to the Worker in order to make sure they are the only one that can accept and submit the HIT.
To create a qualification using the Requester UI:
1. Sign in here, https://requester.mturk.com/qualification_types
2. Click the ‘Create New Qualification Type’ button and give the qualification a name and description.
3. Click Create and the qualification will appear in a list on the page. You can create as many different qualifications as you like.
To provide a Custom Qualification to a Worker who has not submitted an assignment to you using the Website UI:
1. Go to the Worker’s page by adding their Worker ID at the end of this URL: https://requester.mturk.com/workers/
a. Example: https://requester.mturk.com/workers/ABCDEF123456
2. Click on ‘Assign Qualification Type’ button.
3. Choose the Qualification you want to assign from the pop-up list.
4. Once you check the box for the qualification, you will be prompted to assign a score from 1 to 100, based on how you rate that particular Worker.
Create the HIT
1. Click on the ‘Create’ tab and select ‘New Project’.
2. Choose the ‘Survey Link’ category and click ‘Create Project’.
3. If you are making a HIT for only one Worker, change the Properties screen to look like the following. If you are making a HIT for multiple Workers, you can edit the properties however you need to, primarily the title and the number of respondents (second highlighted item).
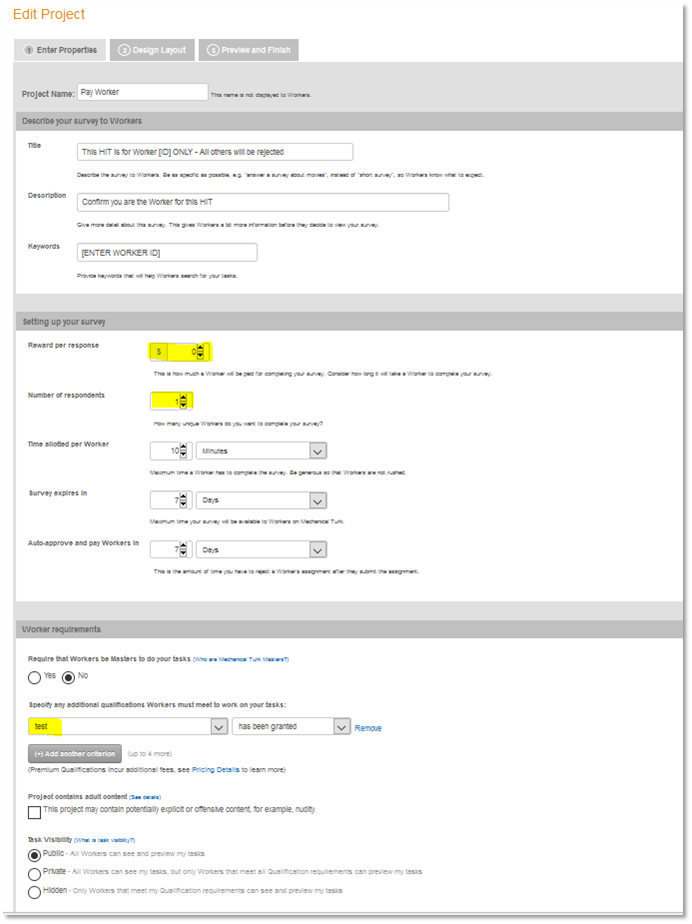
a. The bottom highlighted area is where you would add the Custom Qualification that you created to ensure only that Worker can accept the HIT. Click ‘Add another criterion’ and select your qualification. Set the integer amount to what you assigned the Worker.
b. Note: If you want to pay Workers through a bonus, set the reward to $0 (first highlight item). However, if you want to pay them through this HIT, set the reward amount to the amount you want to pay.
4. Click the ‘Design Layout’ button at the bottom or the ‘Design’ tab at the top.
From the toolbar, click the ‘Source’ button. Remove all the current HTML code in the window and replace it with the following HTML:
<!-- For help on using this template, see the blog post: https://blog.mturk.com/editing-the-survey-link-project-template-in-the-ui-7c75285105fb#.py7towsdx --><!-- HIT template: SurveyLink-v3.0 --><!-- The following snippet enables the 'responsive' behavior on smaller screens -->
<meta content="width=device-width,initial-scale=1" name="viewport" />
<section class="container" id="SurveyLink"><!-- Instructions -->
<div class="row">
<div class="col-xs-12 col-md-12">
<div class="panel panel-primary"><!-- WARNING: the ids "collapseTrigger" and "instructionBody" are being used to enable expand/collapse feature --><a class="panel-heading" href="javascript:void(0);" id="collapseTrigger"><strong>Payment for Non-Submitted HIT</strong> </a>
<div class="panel-body" id="instructionBody">This HIT is to pay Workers who weren't able to submit a previous HIT for payment. Only the Workers listed below will be accepted. All others will be rejected.</div>
<div class="panel-body">- ABCDEFG1234567</div>
</div>
</div>
</div>
<!-- End Instructions --><!-- Survey Link Layout -->
<div class="row" id="workContent">
<div class="col-xs-12 col-md-6 col-md-offset-3"><!-- Content for Worker --><!-- End Content for Worker --><!-- Input from Worker -->
<div class="form-group"><label for="surveycode">Please Enter Your Worker ID:</label> <input class="form-control" id="surveycode" name="surveycode" placeholder="e.g. 123456" required="" type="text" /></div>
<!-- End input from Worker --></div>
</div>
<!-- End Survey Link Layout --></section>
<!-- Please note that Bootstrap CSS/JS and JQuery are 3rd party libraries that may update their url/code at any time. Amazon Mechanical Turk (MTurk) is including these libraries as a default option for you, but is not responsible for any changes to the external libraries --><!-- External CSS references -->
<link crossorigin="anonymous" href="https://maxcdn.bootstrapcdn.com/bootstrap/3.0.3/css/bootstrap.min.css" integrity="sha384-IS73LIqjtYesmURkDE9MXKbXqYA8rvKEp/ghicjem7Vc3mGRdQRptJSz60tvrB6+" rel="stylesheet" /><!-- Open internal style sheet -->
<style type="text/css">#collapseTrigger{
  color:#fff;
  display: block;
  text-decoration: none;
}
#submitButton{
  white-space: normal;
}
.image{
  margin-bottom: 15px;
}
/* CSS for breaking long words/urls */
.dont-break-out {
  overflow-wrap: break-word;
  word-wrap: break-word;
  -ms-word-break: break-all;
  word-break: break-all;
  word-break: break-word;
  -ms-hyphens: auto;
  -moz-hyphens: auto;
  -webkit-hyphens: auto;
  hyphens: auto;
}
</style>
<!-- Close internal style sheet --><!-- External JS references --><script src="https://code.jquery.com/jquery-3.1.0.min.js"   integrity="sha256-cCueBR6CsyA4/9szpPfrX3s49M9vUU5BgtiJj06wt/s="   crossorigin="anonymous"></script><script src="https://maxcdn.bootstrapcdn.com/bootstrap/3.0.3/js/bootstrap.min.js" integrity="sha384-s1ITto93iSMDxlp/79qhWHi+LsIi9Gx6yL+cOKDuymvihkfol83TYbLbOw+W/wv4" crossorigin="anonymous"></script><!-- Open internal javascript --><script>
  $(document).ready(function() {
    // Instructions expand/collapse
    var content = $('#instructionBody');
    var trigger = $('#collapseTrigger');
    content.hide();
    $('.collapse-text').text('(Click to expand)');
    trigger.click(function(){
      content.toggle();
      var isVisible = content.is(':visible');
      if(isVisible){
        $('.collapse-text').text('(Click to collapse)');
      }else{
        $('.collapse-text').text('(Click to expand)');
      }
    });
    // end expand/collapse
  });
</script><!-- Close internal javascript -->
5. Click the ‘Source’ button again to see what the design looks like. You should see the following. Please note: This is a basic HIT layout to pay a Worker. You can edit the design how you need if you would like other information within the HIT.
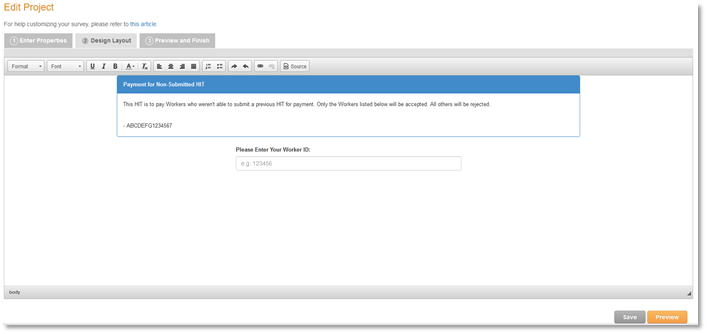
6. You will see a placeholder of ABCDEFG1234567 where you would put the Worker ID (or IDs) that the HIT is for. You can type directly in to this screen to make it easier.
7. Once you have all the Worker IDs you need in the design, you can click on ‘Preview’, which will show you again how the HIT will look for the Workers. Once on this screen, you can then click the ‘Finish’ button.
8. You should now be back at the Create page showing the projects you have created. You can click the ‘Publish Batch’ button next to the project you just created and follow the steps to publish it to the site.
Payment
If you set the amount you want to pay the Worker as the reward amount, all you have to do is approve the submission. However, if you set a $0 amount, you will need to grant a bonus after you have approved the submission.
To do this, go to the Manage tab and click on the Workers link at the top of the page. Click on the Worker ID that you want to open that Worker’s page. (You can also access this page by clicking on the Worker’s ID link on the Review Results page or in the CSV file.)
Select the Bonus Worker button on the right side of the page. Enter the amount and provide the assignment ID. To locate the assignment ID, download the batch results and locate the Worker’s ID, the corresponding assignment ID is in the same row. Keep in mind that assignment IDs are unique for each Worker.
<hr /><p>Paying for Non-Submitted HITs was originally published in Happenings at MTurk on Medium, where people are continuing the conversation by highlighting and responding to this story.</p>